Across Britain, drivers weigh time, cost and pride daily.
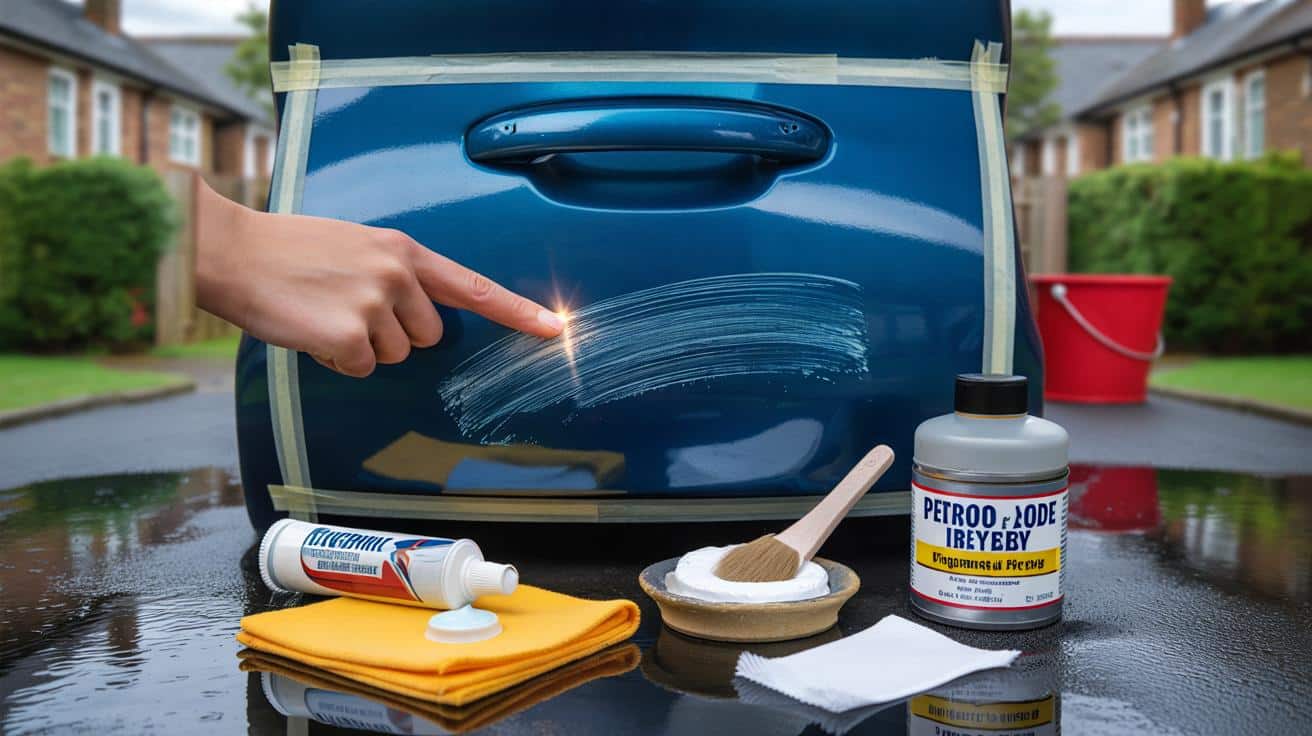
From supermarket scuffs to hedgerow pinstripes, the season exposes every blemish. Workshops book up. Bills creep higher. Many motorists now reach for cupboard staples and smart repair kits, aiming to restore shine without a full bodyshop visit. Here’s how to judge the damage, act fast, and keep costs under control.
A quiet surge in scratch fixes as budgets tighten
Cosmetic repairs often fall to the bottom of household spending. Yet a dull mark can drag down a car’s value and your mood. Independent repairers report brisk trade for minor blemishes as drivers choose targeted work over full repaints. At the same time, DIY methods have gained traction because they save time and preserve panels between professional visits.
Never rub dry. Grit acts like sandpaper. Wash, rinse and dry the area before any touch, every single time.
Road film builds quicker in damp weather, which makes fine marks look worse. Simple preparation gives you a head start: a bucket wash, a clean microfibre, and strong light to assess depth.
The 8-minute “fingernail” test: can you fix it yourself?
You can sort many flaws at home if the scratch sits in the clear coat. Run a clean fingernail across the mark.
- If your nail does not catch, the defect likely sits in the clear coat. DIY methods can work quickly.
- If your nail catches, the scratch may have cut into basecoat or primer. You’ll need polish, a paint stick, or a smart repair.
- If bare metal or plastic shows, skip home remedies on their own. Protect the area and plan a targeted repair.
If your nail doesn’t catch, you can often restore gloss at home for under £12 in about 10 minutes.
Inside the cupboard: what actually works on light scuffs
Toothpaste and bicarbonate, used with care
White, non-gel toothpaste contains mild abrasives. On a clean, dry panel, dot a pea-sized amount on the mark and work in small circles with a damp microfibre for 30–60 seconds. Wipe and inspect. Repeat once if needed. Bicarbonate of soda mixed with a little water forms a gentle paste that tackles hazing and micro-marring in a similar way.
Both options remove a tiny amount of clear coat to level the surface, which is why light pressure and short sets matter. If the gloss falls or the area turns cloudy, stop and switch to a dedicated automotive polish.
Cigarette ash as a traditional polish
Slightly damp, very fine ash behaves like an ultra-light abrasive. It can lift transfer marks from paint rubbed by another object. Use sparingly on a clean cloth, then neutralise with a proper wash. Avoid near windscreens or matte finishes.
Quick gloss tricks that buy you time
When you need the car to look presentable fast, temporary fillers hide micro-defects by altering how light reflects.
- WD‑40: a light mist followed by a careful wipe can darken the mark and improve uniformity. It will wash off. Keep it away from brake components and glass.
- Vegetable oil, furniture wax or petroleum jelly: used thinly on a clean surface, they mask faint scuffs for a day or two. They do not fix damage, but they improve first impressions.
These are stop-gaps. Wash the area later and apply a proper sealant or wax to sustain the effect.
When to upgrade: polishes, renovators and touch-up pens
Deeper scratches need targeted products. A fine-cut automotive polish or a paint renovator blends the edges and restores clarity. Work by hand with a foam applicator in short, controlled sets. Check results in two types of light: daylight and a torch at a shallow angle.
If colour shows through or the scratch has pierced the basecoat, a touch‑up pen matched to your paint code covers the exposed area and protects it from corrosion. Most cars carry a code on a door jamb or in the handbook. Test the pen on tape first to judge flow. Apply thin coats, let them cure, then level with a nib of polish once hard.
Picking the right products
- Fine-cut polish for clear-coat marks.
- Compound only if polishing fails, and keep passes light.
- Touch‑up paint that matches the vehicle code exactly; avoid “near enough” shades.
A typical clear coat measures 30–50 microns. A cautious hand polish removes 2–5 microns. Think in microns, not minutes.
What you need and how long it takes
- Two microfibre cloths (£5–£8 for a pack): one for product, one for buffing.
- Non-gel white toothpaste or bicarbonate paste (£1–£3): for ultra-fine marks.
- Fine-cut automotive polish (£8–£15): for clear-coat defects.
- Touch‑up pen (£12–£20): for basecoat or primer exposure.
- Masking tape and a good torch: to define the area and inspect progress.
Costs and time at a glance
| Method | Best for | Typical cost | Time | Risk level |
|---|---|---|---|---|
| Toothpaste/bicarbonate | Haze and ultra-fine scuffs | £1–£3 | 8–12 minutes | Low, if pressure stays light |
| WD‑40/oil/wax filler | Temporary masking before a viewing | £0–£8 | 3–5 minutes | Low, effect washes off |
| Fine-cut polish | Clear-coat scratches that catch faintly | £8–£15 | 15–25 minutes | Medium, avoid over-working |
| Touch‑up pen | Through to basecoat/primer | £12–£20 | 30–60 minutes plus curing | Medium, colour match critical |
| SMART repair (pro) | Deep, wide or multiple scratches | £90–£150 per panel | 1–3 hours | Low with reputable tech |
Common pitfalls that make scratches worse
- Skipping the wash stage; rubbing dust into paint causes new marring.
- Using kitchen towels; they shed and can mark soft clear coats.
- Working on a hot panel; products flash and drag.
- Pressing hard to “speed it up”; controlled, short sets beat force.
- Applying fillers on matte paint or over paint protection film; they can streak.
Test any method on an inconspicuous spot first, especially on matte finishes, wraps or protective films.
Why small fixes matter to your wallet
Untreated scratches collect dirt and moisture, which increases contrast and makes panels look older. On darker colours, this effect appears within days of wet weather. Keeping the clear coat smooth reduces that build-up, which helps at resale. Buyers look along door lines and around handles first; tidiness in these zones raises confidence. A ten-minute tidy can nudge valuations by far more than the price of a cloth and polish.
Insurance complicates the picture. Cosmetic claims often count as fault claims, even when damage happens in a car park. That status can push next-year premiums higher. Many motorists now pay out-of-pocket for minor blemishes to avoid rating changes, which explains the rising interest in home fixes and SMART work.
Seasonal prep that prevents fresh marks
Routine that works in wet months
- Rinse buckets and wash mitts before each use to flush grit.
- Top up a quality wax or sealant every 6–8 weeks; it makes scuffs less likely to stick.
- Park away from trolley bays and hedge lines where possible.
- Keep a small kit in the boot: microfibres, a mild detailer and painter’s tape.
Once winter grit appears, rinse arches and doors more often. Road salt accelerates corrosion on exposed primer, so touch up any through-scratch before long trips. If you drive with roof racks or bikes, add paint protection film to contact points to block strap rub.
A final word on technique and safety
Work slowly, under good light, and measure progress rather than time. Clear coats vary by brand and age. A modern clear typically runs 30–50 microns thick; you need only remove a fraction to level haze. Avoid solvents near rubber trims. Keep WD‑40 off discs and pads. Ventilate if you use products indoors. Gloves help keep oils off the paint, which improves final shine.
If in doubt, try the least aggressive choice and escalate. Document the area with photos before and after, which helps if you later book a SMART repair. A calm approach, a few cheap items and the 8‑minute test will tell you how far you can go at home without spending more than you need.