Households feel it most where boots, toys and hoovers collide.
Across the country, homeowners face the same eyesore at floor level as heating clicks on and humidity rises. Trades are busy, budgets feel tight, and a chipped skirting board can look like a far bigger job than it is. Here’s the fast, low-mess method people use to restore a clean line without lifting a single board.
Why skirting boards chip in the first place
Skirting takes the first blow from furniture feet, prams, hoovers and playful pets. Impacts break paint films. Tiny gaps let moisture creep under the coating. Autumn and winter add a one-two punch: damp air swells timber and MDF, then central heating dries it. Surfaces move. Paint loses grip along edges and corners.
What the board is made of matters
MDF paints smoothly and costs less, but it swells when moisture lingers near cold floors. Softwood dents more easily but tolerates small knocks. Hardwood resists impacts yet costs more. uPVC shrugs off damp but looks very different. Knowing the material helps you choose filler and paint that flex and bond well.
Most flaking starts where impact meets moisture and paint can’t hold. Fix both, and chips stop spreading.
Colour and sheen also play a role. A glossy finish shows scratches and repairs. Matt hides texture but scuffs easily. Mid-sheen eggshell or satinwood often hits the sweet spot for busy hallways and kitchens.
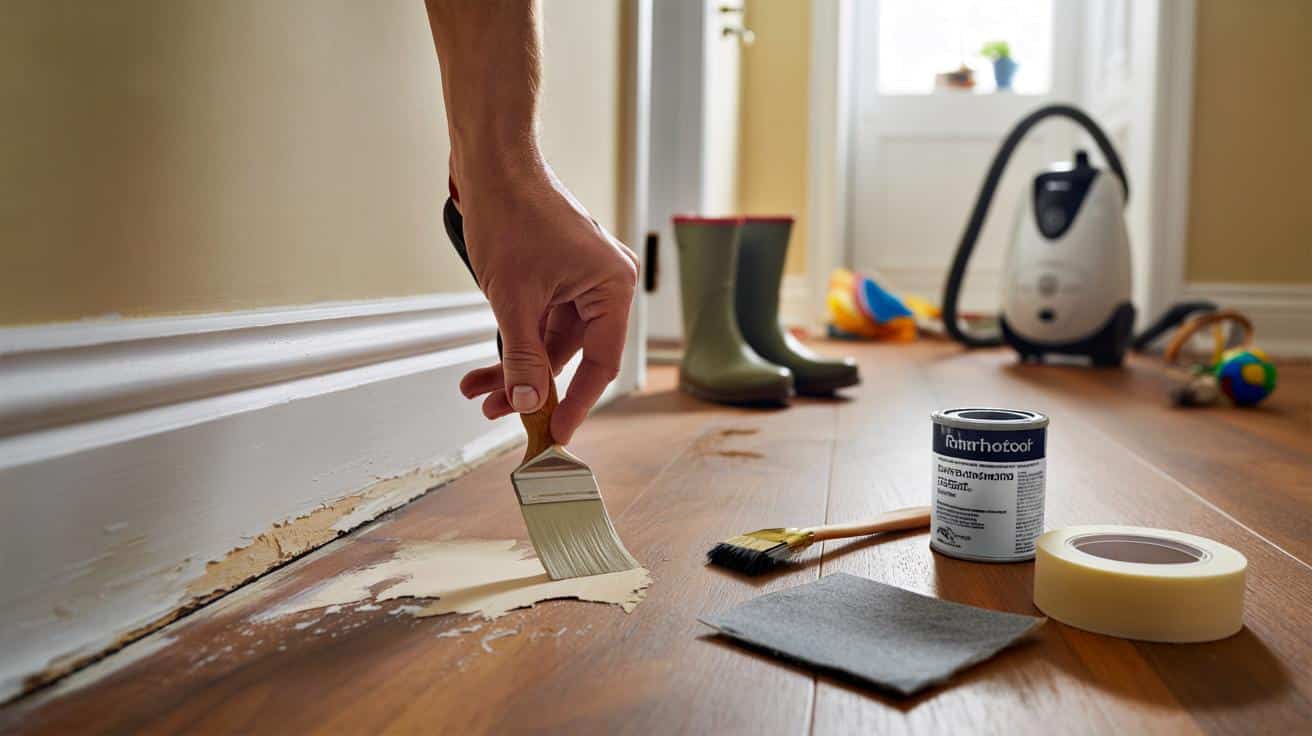
The 7-minute fix that skips mess and demolition
You don’t need to remove the skirting. You only need to stabilise loose edges, rebuild the chip with wood filler, level it, then touch in the colour. Hands-on time stays short. Drying does the heavy lifting.
Fast step-by-step timeline
- 1 minute: Dust and degrease with a slightly damp cloth. Add a drop of mild soap for greasy marks.
- 90 seconds: Trim flaky paint with a sharp blade or scraper. Feather the edges with fine sandpaper (240 grit).
- 2 minutes: Press wood filler into the chip with a small spatula. Slightly overfill to allow for sanding.
- 2 minutes: Once dry, level with light circular sanding. Wipe clean.
- 1 minute: Touch in with matching paint. Two thin coats beat one heavy coat.
Keep pressure light. The goal is to blend into the original profile, not to carve a flat patch.
Choosing the right filler and paint
For MDF and timber, a fast-drying water-based wood filler works well for small chips. It sands easily and accepts paint. For deep gouges, use a two-part filler that cures harder and resists shrinkage. Prime bare MDF spots if they look thirsty. Match the existing paint type: use satinwood on satinwood, eggshell on eggshell. A small artist’s brush helps you keep the line crisp at the floor.
| Item | Typical price (UK) | Quantity needed | Hands-on time |
|---|---|---|---|
| Water-based wood filler | £6–£12 | Small tub or tube | 2 minutes application |
| Fine sandpaper (240 grit) | £2–£4 | 1–2 sheets | 2 minutes sanding |
| Touch-up brush or mini roller | £3–£6 | 1 | 1 minute painting |
| Matching paint | £8–£18 | A tester pot often suffices | 30–60 minutes drying between coats |
| Masking tape (optional) | £2–£4 | 1 roll | 30 seconds |
Expect total hands-on time under 10 minutes for a small area. Drying adds 45–90 minutes, depending on room temperature.
Make the repair last through autumn and winter
Once the edge looks neat, protect it from the same forces that caused the damage. Small changes to cleaning, airflow and furniture movement go a long way.
Simple daily habits that protect the paint line
- Switch to a soft brush or floor tool on the vacuum instead of hard plastic toes.
- Stick felt pads on furniture that sits near walls, especially dining chairs and shoe benches.
- Ventilate after showers and cooking. Keep indoor humidity roughly between 40% and 60%.
- Run a small dehumidifier in problem rooms during wet spells.
- Wipe spills at floor level quickly. Water trapped behind rugs can creep into MDF.
When not to use the quick fix
Skip filler and call a pro if you see black mould spreading, a soft, crumbly baseboard, or stained plaster above the skirting. Those signs point to leaks or rising damp. If your home may have very old paint layers, avoid dry sanding. Lead-based coatings can appear in pre-1990s properties. Use a test kit or wet-sand with proper protection and capture the slurry.
If the timber feels soft under a fingertip or the paint bubbles over a wide area, investigate moisture first.
What this approach saves you
Replacing a 2 m length of skirting can mean cutting, pinning, caulking, priming and repainting the whole run. Materials cost from £18 to £30, plus an hour or two of labour. A small repair, by contrast, uses pennies’ worth of filler and a tester pot. Many households save £38–£85 on a single incident and avoid two hours of disruption. You also cut waste and the risk of damaging nearby plaster.
Extra tips that raise the finish
Keying and priming explained
Keying means roughening glossy paint just enough for the new coat to grip. A few light strokes with 240 grit creates micro-scratches that you can’t see but paint can feel. Bare MDF drinks paint, so dab a quick primer coat only where you see exposed fibres. That stops dull patches after drying.
Match colour and sheen with confidence
Sheen mismatch gives repairs away more than colour. If you can’t find the exact paint, choose the same sheen first. Eggshell hides touch-ups better than full gloss. For colour, compare under daylight, not warm bulbs. Many shops scan a sample; you can also test three close shades and pick the one that disappears once dry.
A weekend schedule that actually fits life
Evening one: clean, trim flakes, fill, then watch it dry while you cook. Before bed, give it a gentle sand. Morning two: paint a light coat while the kettle boils. After school run or errands, add a second coat. By dinner, the edge looks tidy and hardened enough for careful use.
If the chip is larger than a coin
For deep gaps bigger than a 20p, shape the cavity first. Undercut ragged paint with a blade so the filler locks in. Build in two thin layers rather than one thick lump. For painted softwood, a two-part filler cures hard and resists future knocks. Sand with a small block to keep the moulding profile true.
Small upgrades that prevent repeat chips
A thin bead of decorator’s caulk where the skirting meets the floor stops mop water and winter drafts from sneaking in. Switch to washable eggshell or satinwood in high-traffic zones. Where dog beds or toy baskets sit against walls, add a clear stick-on guard just at the scuff line. None of this changes the look, but it protects the most vulnerable edge.
Related fixes worth pairing with the job
While you have the brush out, check door architraves near push plates. These areas take the same abuse. A quick key, a dab of filler on corners, and a thin coat refreshes the room far beyond the minutes invested. If you plan to repaint a whole wall later, keep a note of the paint and sheen you used on the skirting so future work blends neatly.