Your drill hand shakes. Winter projects pile up. One slip, one chip, and the bill climbs fast.
Across the country, homeowners face the same dilemma: fix a shelf, hang a mirror, avoid a spiderweb crack. Retailers report a spike in bathroom and kitchen upgrades as the cold sets in. So the question lands on your workbench. Can you drill a tile without paying for a replacement and a headache?
Why winter DIY brings cracked tiles and big bills
Colder months push more work indoors, and tiles bear the brunt. Glazed surfaces are hard yet brittle. Force concentrates at the drill tip. Heat builds quickly. The glaze fractures, then the body gives way. One mistake can turn an £18 porcelain tile into rubble in seconds.
Insurers describe repeat offenders. The hammer setting left on from masonry work. A blunt bit. A rushed hand. Add hidden pipes or a cable behind the wall and the cost can jump from £150 to £300 before you can say “plug detector”.
Speed cracks tiles. Stability prevents it. The drill does the cutting. Your job is control.
The tiny detail people skip: tape that locks the bit and cushions the glaze
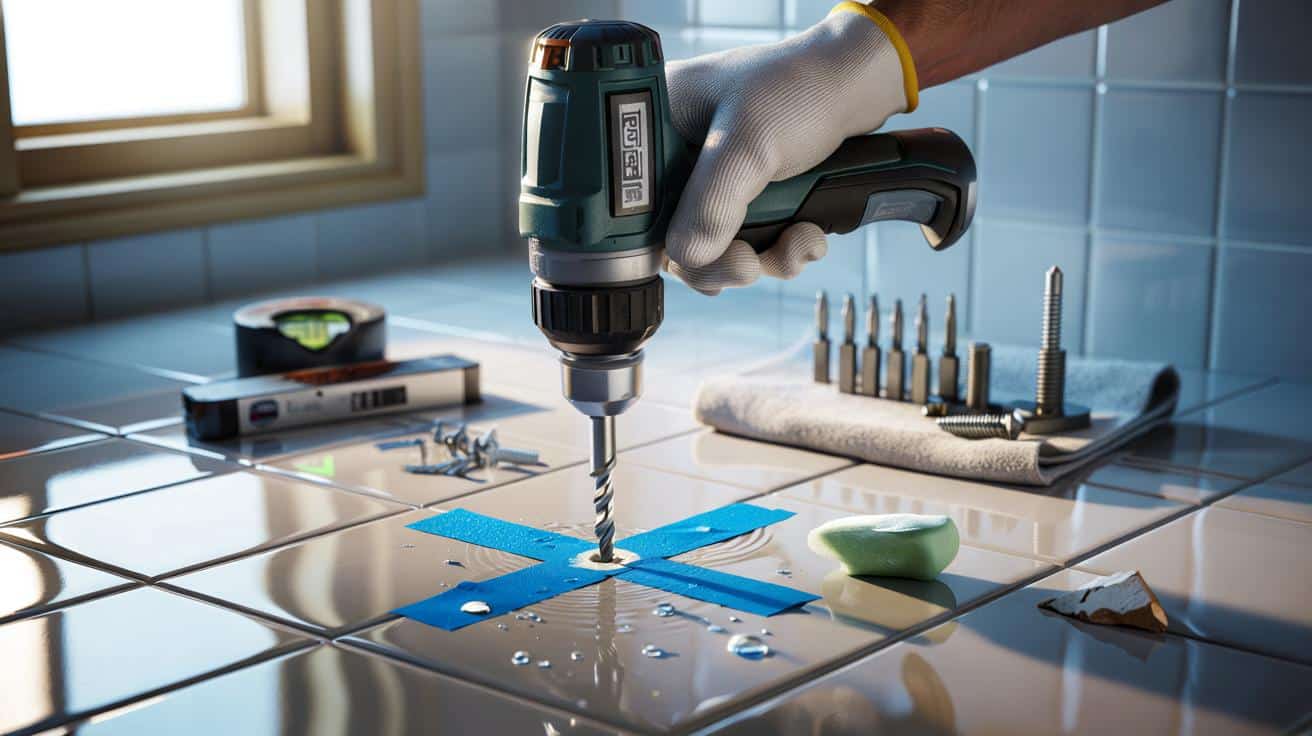
This is the small change with big results. A simple strip of tape on the tile gives bite to the drill and dampens initial shock. Painter’s tape works. Masking tape works. Two criss-crossed pieces work even better on glossy porcelain.
How to place the tape for grip and cushioning
- Cross two short strips to form a “+” over the target area.
- Press firmly to remove air pockets and strengthen adhesion.
- Mark the centre on the tape with a fine pencil or a permanent marker.
- Create a tiny dimple with a nail punch or a hardened screw tip, no more than a pinprick.
A 20p strip of tape can save a £220 repair. Use it every time.
Marking that never drifts
Use a spirit level and measure twice. A 2 mm error sends a shelf off-level forever. If you need multiple holes, mark and number each point. Place a bit of low-tack tape on the level’s feet to avoid scratching the glaze.
Choose the right bit like a pro
Bit choice changes everything. Porcelain and ceramic demand edge control and abrasion, not blunt force. Keep masonry bits for brick. Reach for tungsten carbide spear points or diamond-tipped bits for tiles.
What to buy and what to avoid
- Pick a tile bit: tungsten carbide spear tip for ceramic and glass, or a small diamond-tipped bit for hard porcelain.
- Keep one small “starter” bit (4 mm) and one final-size bit (6–8 mm). Step up in sizes for clean edges.
- Avoid old or shiny masonry bits. They skate, overheat, and chip the glaze.
- Choose a slow, torque-rich drill. A clutch helps. A trigger with fine control helps more.
| Bit type | Best for | Typical speed | Cooling | Typical price |
|---|---|---|---|---|
| Tungsten carbide spear | Ceramic wall tiles, glass | Low (300–600 rpm) | Recommended | £6–£10 |
| Diamond-tipped tile bit | Porcelain, hard gres | Very low (200–400 rpm) | Essential | £10–£18 |
| Diamond hole saw | Large holes for pipes | Low (200–400 rpm) | Essential | £12–£25 |
Speed, pressure and cooling that save the glaze
Set the drill at its slowest speed. Aim for 300–500 rpm for the first 10 seconds. Keep the bit at a slight angle to stop skating, then straighten as it bites. Apply gentle, steady pressure. If dust turns brown or you smell scorch, stop and cool.
- Keep an old sponge soaked in water. Dab the bit every 5–10 seconds.
- For porcelain, build a small “dam” of blu-tack or putty around the mark and add a teaspoon of water.
- Never use hammer mode on a glazed surface.
Low speed, light pressure, constant cooling. Treat tile like glass, not concrete.
A three-step method you can repeat
- Tape and mark: cross the tape, add a dimple, and level your marks.
- Start small: drill a pilot hole with a 4 mm tile bit at low speed, cooling as you go.
- Finish clean: step up to your final size and ease the pressure as the bit breaks through.
If the tile is not yet fixed, place a scrap of timber behind it to support the exit and prevent blowout. On walls, slow down just before the bit reaches the adhesive layer. Let the bit finish the last millimetres under its own weight.
Common myths that cost you money
- “High speed makes a cleaner cut.” Heat shatters glaze. Slow wins.
- “Any masonry bit will do.” It will wander and chip. Use tile-rated bits.
- “One big bit saves time.” Step drilling controls edges and cuts heat.
- “Tape alone is enough.” Tape helps. Speed, pressure and cooling do the real work.
- “Dry drilling is fine for porcelain.” Water carries heat away and extends bit life.
- “I can eyeball the centre.” A 2 mm drift misaligns brackets and doors.
Safety, hidden hazards and no-drill alternatives
Scan before you drill. A basic detector can spot live cables and pipes behind plasterboard. Aim for between grout lines if you can, yet avoid drilling the grout itself for heavy loads. Wear eye protection and a dust mask. Ceramic dust is fine and sharp.
Not every fitting needs a hole. High-strength adhesive pads or polymer adhesives hold small shelves and hooks. Many carry ratings between 3 kg and 10 kg. Suction cups lose grip with steam and time. Adhesive cures need 24–48 hours. Check the packet and clean the surface with isopropyl alcohol.
What it costs and how to plan your next job
Budget smartly. A pair of tile bits costs £12–£28. A small diamond hole saw for a mixer pipe costs £15–£20. Good masking tape costs pennies. A mid-range detector runs £25–£50. Spend where control matters. Save by reusing guides and practising on an offcut.
- Time per hole: 3–6 minutes for porcelain, 2–4 minutes for ceramic.
- Cooling water: a mug or a small spray bottle keeps heat in check.
- Load rating: pick wall plugs matched to tile over plasterboard and the screw gauge.
Advanced tips for tricky tiles and larger holes
Hard porcelain behaves like stone. Start with a 4 mm diamond bit and step to 6 or 8 mm. For 35–50 mm pipe holes, use a diamond hole saw with a guide jig or a timber template. Clamp the guide, add water within a putty dam, and begin at a slight angle. Keep the core cool throughout.
Avoid drilling right on grout lines for heavy fixtures. The bond is weaker and can crumble. If a layout forces a grout position, use a smaller pilot and expand gently. If tiles are old or hairline-cracked, stick to adhesives or spread the load with wider brackets.
Spend two minutes on setup and save two hours on repairs. Tape, pilot, cool, and finish slow.
One last thought before you pull the trigger
Plan every hole as a mini project. Measure. Tape. Select the right bit. Set the drill to slow. Cool often. Support the exit side where possible. A neat hole keeps water out, hardware square, and your tiles pristine.
Try a rehearsal on a spare tile. Practise the first ten seconds. Feel the bit settle. Once that motion is in your hands, the mirror hangs straight, the caddy feels solid, and your wallet stays shut.